|
GameDB
1.6.0
GameDB Pro is a plugin that provides an easy to use and powerful game and meta data editor
|
|
GameDB
1.6.0
GameDB Pro is a plugin that provides an easy to use and powerful game and meta data editor
|
GameDB is a Unity Plugin that provides an easy to use and powerful game and meta data editor. With this asset your scripts no longer have to use hard-coded references and instead can refer to your database for lists of values, files, prefabs, and other data types. GameDB is designed to produce JSON and associated classes to load and access this data easily within a game. It supports many data types, relationships between tables and hot-reloading to make working with game data easy and intuitive.
Some examples of usages would be for data relating to things like Loot tables, NPC balancing data, Prefab lookups for procedural assets, game configuration, and many many more.
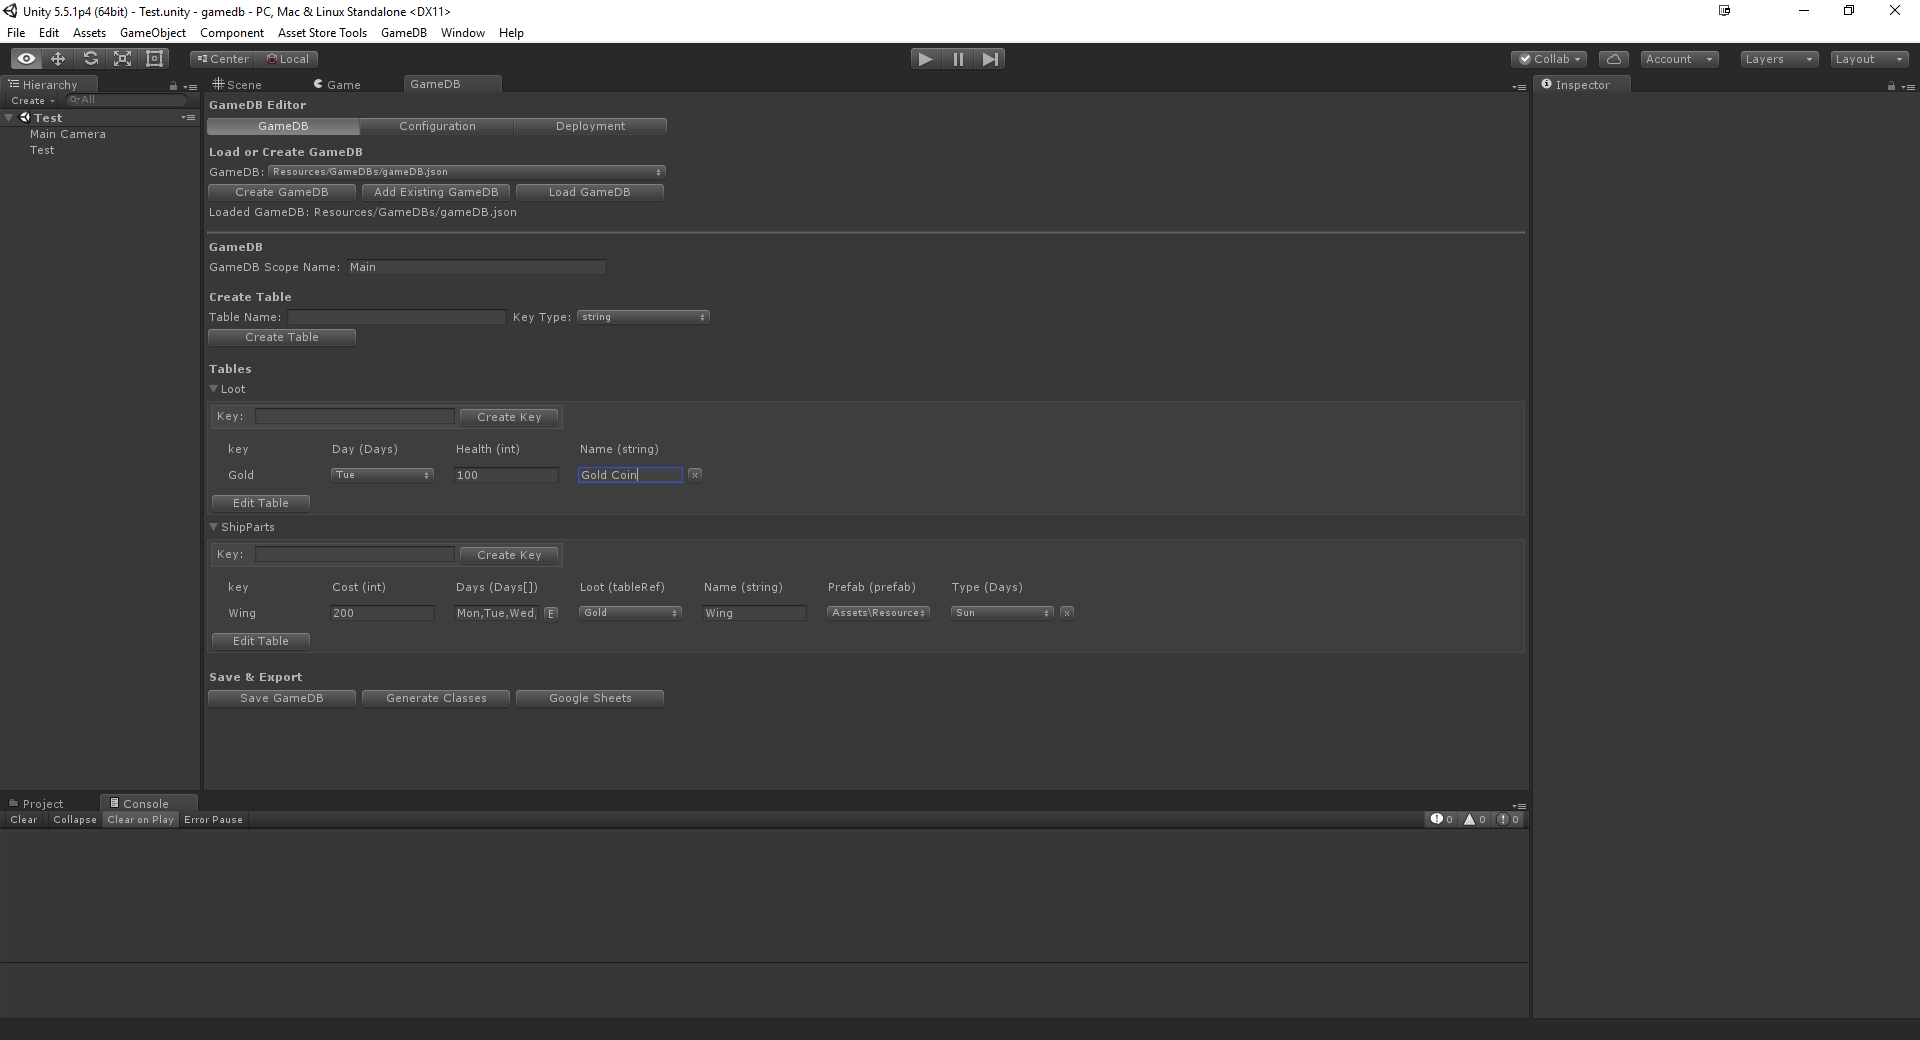
The GameDB Editor window is opened via navigating to Window > GameDB menu and clicking on Open Editor menu item.
To get started creating and editing a gameDB click on the Create GameDB button. This will ask you to select a location to save your gameDB. When you click OK this will create two files a .json and .schema.json file in the directory chosen (recommended location is within a Resources folder as using Resources.Load is one of the easier ways to access the data).
The gameDB will then be loaded and ready to edit.
The first thing to do with your new gameDB is set a Scope Name for the gameDB. This name will be appended to the namespace of the exported C# classes your gameDB creates. For example a scope name of “MyData” would produce the namespace GameDBMyData. This scope name is also used as an identifier for various other things explained in more detail later.
Next you can create tables by entering a Table Name, select a key type and clicking on Create Table. This will create a table below that is collapsed by default. Click on the table name and it will expand to show your table. By default this will be a table with no keys or fields.
To create a field click on the Edit Table button, then enter a Field Name under the Modify Schema section. Select a data Type, check the tick-box for whether you would like it to be an array of data and then click Create Field.
This will then add a field to your table that can be removed with the [x] button (only visible after clicking Edit Table) if required.
To add some data enter a Key in the field at the top of the table then click Create Key. This will create a entry in the table below where you can now enter data for each of your fields.
Once you are happy with the data you have entered you can save the gameDB by clicking on Save GameDB, this will serialise out the data and the schema to the location selected earlier.
Next to use the data in your game you need to export the C# classes that will allow you to access the data. To do this click Generate Classes and select where to export the classes. This will generate C# classes that will provide easy and strongly typed access to your data.
You are free to use the json data however you like but the GameDB plugin generates code based on your data schema that provides an easy way to integrate the data with your game.
When you click Generate Classes this will generate code in the selected location that provide access to the data. Each of the classes will be namespaced with a name like GameDB{SCOPE_NAME_HERE} for example: GameDBMain. These are auto-generated classes and hand editing of the files is generally not recommended.
The main class that represents your game data is the GameDB class. This class will load the json, deserialize it and provide access to each of the loaded tables. The GameDB class also has a OnDBLoaded event that is triggered when the data is loaded.
An example of loading the game data:
A few classes are then created for each of the tables defined in your game data. There is a Table, Schema and Row class. Normally prefixed with the table name for example MyDataTable.cs, MyDataSchema.cs and MyData.cs. The Table class provides accessors for getting a particular row by Key or getting all the rows as a dictionary. The Schema class provides static accessors for the table name, field names and keys in the table. Lastly the Row class represents a particular row in your table and provides accessors for each field in the data.
An example of accessing data:
The gameDB can be edited while in game and hot-reloaded so you can balance while playing the game. If you have the GameDB Editor window opened when you are playing the game you can load one of the gameDBs you have loaded in the game by selecting the gameDB by its name in the Runtime GameDB dropdown, then selecting the base gameDB it was loaded from in the Base GameDB dropdown then clicking Load GameDB.
This will load the gameDB that is in memory in the game and allow you to edit it and then cause the data to reload in-game by clicking the Reload In-Game button. This will cause the OnDBLoaded event to be triggered on the gameDB in the game and when this happens your game code can react to the change in anyway it likes (see advanced topics for working with hot reloading).
The game data you edit while playing the game won’t be saved back to the json until you click the Save GameDB button, meaning you can experiment with changes while the game is running then if you stop playing the game without saving the gameDB those changes will be discarded.
Currently the GameDB plugin supports the following data types:
Arrays
All the above data types can be stored as arrays. To modify the values of an array click on the [E] button next to the field and a popup will show allowing you to modify the size of the array and enter values for each index.
If you have a gameDB from another project or being migrated from somewhere else (or the settings have been reset) you can load this by clicking on the Add Existing GameDB button. Make sure that both the .json and .schema.json files are in the same location together.
To import enums you will need to click on the Configuration Tab at the top of the editor window and expand the Imported Enums section. From here you can import and remove any enum you want.
To support editing the data while playing or support updates of the game data from a server while the client is running. The GameDB has a OnDBLoaded event that is triggered when data has be Imported or Reimported.
Generally data shouldn’t be directly referenced from the gameDB due to overhead with runtime conversions of types (and loading prefabs for the prefab type). Best practice is to cache the values from the gameDB into your game classes for further access.
This means that when the OnDBLoaded event is triggered again you will need to likely re-cache any data you accessed as well as reloading any systems that rely on this data.
This is quite different to how serialised fields work but it allows consistent and deliberate work flows when dealing with data edited at run-time or live updating from a server for example.
The GameDB editor creates a GameDBEditor.settings file in the same location as the plugin under the Editor folder. This file is a JSON file representing the settings that represent your workspace. This can be edited by hand in the event of settings causing any issue. This file contains the paths of the loaded gameDBs, the export path for C# classes and paths to any imported items, plus more.
 1.8.14